fbpx
Select Page
10 Steps to Declutter Your Home, Room by Room

10 Steps to Declutter Your Home, Room by Room

When your home feels like a chaotic mess, it’s hard to imagine it ever feeling tidy again. Finding every surface covered in clutter can be a scary thought. But with the right approach, you can get your home back on track. This will help you maintain your house clean for longer. Let’s face it: most of us have too much stuff in our homes and not enough storage solutions. It is estimated that clearing the clutter from a household may save chore time by 40%.

Getting your home organized doesn’t have to be difficult. If you follow these simple steps, decluttering your home can be a stress-free experience – not something that fills you with dread and anxiety! These ten simple steps will help you declutter your home and make staying tidy a breeze.

book cleaning service online

Step 1: Tidy Up Your House Room by Room

Before you start decluttering rooms in your house, take a few minutes to tidy up your home. Every guide to declutter your home will tell you that you don’t need to spend hours cleaning; just spend 20 minutes tidying up the areas you use most often.

You may also want to tidy up as you go along and put items away as you go. However, if you decide to tidy, make sure your home is clutter-free (or as close to it as you can get it) before you start decluttering. This will help you stay focused and motivated throughout the decluttering process. If you have different areas in your home, such as a living room, dining room, kitchen, and one or two bedrooms, tackle these areas room by room. In case you have lots of small spaces, such as a bathroom, two bedrooms, a kitchen and a living room, tackle these areas as well.

Step 2: Decide What to Keep and What to Toss While Declutter Your Home

According to a guide to declutter your home, before you can decide how to organize your belongings, you first need to decide what items to keep and what items to throw away. According to the National Association of Professional Organizers, we throw away 80% of our belongings every year. For everything you’re not keeping, decide whether it’s worth it to take it to a donation center. If yes, take it there now. In case not, place it in a box and toss it.

When it comes to deciding what to keep, use this rule of thumb: if you haven’t used it in the last year, it’s worth tossing. If you’re not sure if an item is worth keeping, ask yourself the following questions:

  • How often do I use this? 
  • How often do I wish I had this? 
  • Do I have a place to put this where it’s easily accessible? 
  • Does this have sentimental value?

Is you answer yes to any of these questions? Keep the item. If not, toss it.

declutter your home

Step 3: Organize the Items You’re Keeping

Once you’ve decided what items to keep and what items to toss, the next step is to organize the items you’re keeping. If you’re not sure how to organize the items you’re keeping, think about the way you currently use your home.

A simple guide to decluttering your home is to ask yourself, what areas of your home are you using most often? What areas are in need of organization? If you’re not sure how to organize specific items, there are lots of online resources that can help, such as organizing blogs, videos, and websites.

Organizing blogs and websites are great resources for creative and effective tips to declutter your homePinterest, for example, is a great resource for home organization ideas. Simply search for “home organization” or “home decorating” ideas and you’ll be able to see lots of pins that can help you get your home decluttered.  Similarly, YouTube is full of videos with tips for declutter your home.

Step 4: Declutter Your Kitchen

Your kitchen is likely the busiest room in your house. Which means it can quickly become messy, and stay that way for a long time. The kitchen can be an especially great place to declutter. Because you can use many of the items you already have at home (such as containers, bags, and baskets) to organize your items and declutter your kitchen.

There are plenty of tips for decluttering your home. But whatever technique you use, make sure you do it in 10 minute cleaning bursts. This is enough time to declutter one small area of your kitchen while also keeping your mind focused and motivated to finish the job. These areas of your kitchen are worth decluttering:

  1. Counters: Clear off your counters and wipe them down. If possible, store away any items you don’t need on the counter. In case you cannot store items away, put them in a bag or bin and schedule a time to toss them later.
  2. Cabinets: Tidy up your cabinets and store items away. You may want to consider hiring a professional organizational consultant to help you organize your cabinets.
  3. Drawers: Tidy up your drawers and store items away. If you have lots of loose items that don’t need to be stored, consider putting them in a bag or bin. And scheduling a time to toss them later.
  4. Fridge and Freezer: Clean out your fridge and freezer. If you have items in your fridge and freezer that you don’t need and can’t or don’t want to eat, put them in a bag or bin and schedule a time to toss them later.
  5. Shelving: If you have shelving in your kitchen, tidy up the items on the shelves.
declutter your kitchen

Step 5: Declutter Your Bedroom

Your bedroom is the place you rest and rejuvenate each day,. Which means it’s worth taking the time to declutter your room. If you’ve been putting off decluttering your bedroom because you’re not sure where to begin, a simple trick can help you get started.

The best tip for declutter your home is to tackle one item in your bedroom every 10 minutes. Once you’ve completed the item, move on to the next one. This is enough time to declutter your bedroom. Keep your mind focused so you don’t get side-tracked or overwhelmed by the task at hand. Your bedroom is a great place to declutter these areas:

  1. Drawers: Tidy up your dressers and drawers and store items away. If you have lots of loose items that don’t need to be stored, consider putting them in a bag or bin and scheduling a time to throw them away later.
  2. Closet: If you have a walk-in closet, tidy up your closet and store items properly. You can sort items by clothing, footwear, and accessories, and place them accordingly. Neatly fold or hang up clothes that you actually use, while donating the clothing items you no longer use or need.
  3. Walls: If you have posters or framed pictures on your walls, take them down and store them away if they have started looking old or worn out.

Step 6: Declutter Your Bathroom

Your bathroom is one of the toughest rooms to declutter your home. It’s easy to let the clutter build up in your bathroom simply because it seems like a tough job. To declutter your bathroom, start by tackling the places you use daily. These areas of your bathroom are worth decluttering: 

  1. Sinks: The bathroom sink has a high potential for becoming unsightly. Start with a good clear-out. Then clean and sanitize the sink, using warm water and detergent.
  2. Counters: One proven way to declutter your bathroom counters is by using a tray to organize your toiletries. You can also use wall-mounted holders to shift the extra stuff, like bottles, jars, and brushes.
  3. Cabinets: Take stock of the items you have piling up in your bathroom cabinets, and see if take away the items that don’t really belong there. Throw away any worn-out, damaged, brittle, or out-of-date hair accessories, dental items, medicine, and toiletries.
  4.  Walls: You should declutter your bathroom by sections. Just as you remove unnecessary items from shelves and counters, it’s equally important to declutter your walls. Take down picture frames, wall hangings, and wall-mounted holders that look unsightly or clutter the small space.

declutter your bathroom

Step 7: Declutter Entry, Mudroom, and Foyer

Even if you lack a formal foyer or mudroom, your home still has an entrance. The greatest approach to making the most of any doorway, no matter how small or narrow, is to routinely tidy it up.

The most efficient tips for decluttering your home tell you to begin with the entryway furniture you already have,. Such as a desk, console, or side tables. Empty all of the drawers and make a snap judgment about what to retain and what to throw away. Check the tops of all the workstations and game consoles.

Are your keys and other valuables safely stored? Check that there is enough space for people to move about and that nothing is in the way. This will make packing up and leaving the home in the mornings much less of a hassle.

Similar to cleaning out any other closet, you should begin by putting away shoes and boots, then coats, and last, any extras you may have. Just like the living room, the entryway tends to accumulate a lot of clutter as a result of people leaving their belongings there. You should spend some time clearing up the clutter that has accumulated in the foyer.

Step 8: Tackle the Living Room

The living room is notoriously difficult to maintain in terms of cleanliness on a regular basis. For the simple reason that storage space is at a premium in bedrooms and not the living room. Where most people spend the majority of their time. Although you have a TV stand and bookshelves, they aren’t very ideal for keeping all sorts of mess.

Consider reserving a specific cabinet or shelf for often used items like a TV remote, stacks of periodicals, or books. Start with the smaller pieces, including bookshelves, consoles, and end tables. Following that, you should concentrate on the coffee table and the media console.

Toss their contents after a thorough evaluation, and put the containers back where they belong. Organize the room by putting away books, sorting through mail, putting away the TV remote, folding the blankets, etc.

One of the best tips for declutter your home requires you to get rid of everything that’s not associated with your TV or media center. Do you have it and use it? How well does it perform? It’s best to keep things like power cords and gaming gear close to where you use them.

Take care of the toys, at long last. Check for damage on all of the playthings. Can you tell whether it works properly now? Do they still use it as a toy? Put away or recycle every toy. Get your put-away basket ready and return items from other rooms to their rightful locations.

declutter your home

Step 9: Clear Out Your Office

Often, people cease seeing the mess in their homes and workplaces because they have gotten used to it. However, clients or visitors will notice the disarray in your home workplace far more than you would.

There are probably things in your home office that haven’t been used in months. So it is time to find them and declutter your home so you can make more space for what really matters. 

It may sound counterintuitive, but a good way to start clearing out the clutter in your workplace is to empty it totally. Clean all surfaces, and then gradually put items back in as they are needed. This way, it can be seen which items are necessary and which are not. Eliminating all potential sources of disruption will aid in maintaining order and increasing efficiency.

Once you’ve cleared out all the clutter in your workplace, take a look around and see if there’s a better way to lay out the space. Simply making better use of our available workplace space may help us maintain a clutter-free environment. You can divide the room into zones for different jobs, or you can just move the things you use most often to the front.

Step 10: Schedule another Round of Declutter Your Home

While this isn’t ideal, it’s important to remember that declutter your home is an ongoing process. Clutter has to be addressed every three to six months to prevent it from becoming out of control again. You should schedule frequent blocks of time to organize your life, since this will go a long way to make your living space safe, sanitary, and healthy for you and your loved ones.

declutter your home

Conclusion

Decluttering a whole house is a massive task, whether you’re relocating or just wanting to live more simply. Doing things in phases is the greatest approach to simplifying the process of decluttering. Don’t try to do too much at once; instead, concentrate on one area (like the kitchen cabinets) at a time. You should not stop on until you’ve finished everything in one area.

Hiring professional cleaners can make this process much easier since they bring the right tools and expertise to the job. They not only save you lots of time and hassle but also stress. Whether you are looking for a routine cleaning or deep cleaning, we offer the most affordable and reliable home cleaning services in town. Call My Cleaning Angel today to discuss how we can help!

How To Clean A Coffee Maker?

How To Clean A Coffee Maker?

In this detailed guide to clean a coffee maker, we will take you through the methods and steps of effectively cleaning it. 

Did you know that cleaning a coffee maker regularly can extend its lifespan by almost ten years? And that it’s also the most important part of keeping it neat to brew healthy coffee. A clean machine is less likely to develop mold, mildew, or other kinds of unwanted bacteria. Keeping it clean also ensures a better-tasting cup of coffee every time. 

Fortunately, cleaning a coffee maker is not difficult – you just need to know the right ways to do so. In this guide, MyCleaningAngel provides you with excellent tips on how to clean it at home in no time! Let’s see what you need to know to deep clean it.

book cleaning service online

The Importance of Cleaning a Coffee Maker

Do you love your trusty old coffee maker? It makes the perfect cuppa every time, right? Keeping it clean is essential to ensuring it continues to make great cups of joe. A build-up of residue and old oils can clog its pipes and prevent it from working properly. Deep cleaning it regularly will keep its performance at its peak, extend its lifetime and reduce the risk of it breaking down at an inconvenient moment.

Keeping your coffee maker clean can extend its lifespan, reduce maintenance and repair costs, and improve the taste of your cup of coffee. It can reduce the risk of acquiring health issues such as stomach aches, skin irritation, and allergies. A clean coffee maker will help you save money as it will reduce the need for water, power, and cleaning solution. Cleaning your it regularly will help you avoid frequent replacements. How Often Should You Clean it?

Cleaning the product after each use is the most important part of keeping it clean and hygienic. If you are using a standard coffee maker without a built-in cleaning function, you’ll need to clean it thoroughly at least once a week. In case you have a coffeepot with a self-cleaning function, you can clean it once in every month. If your product is getting old, or you don’t remember when you last cleaned it, it’s best to clean it thoroughly. 

Simple Tips for Quick Coffee Maker Cleaning

When your coffee machine is not in use, make sure to clean it thoroughly.

  • Clean the dispenser area and any removable parts as needed
  • Clean the water reservoir every three to four weeks
  • Remove the filter and clean it thoroughly
  • Clean the outside of the coffee maker with a sponge or dishcloth
clean a coffee maker

How to Clean a Coffee Maker?

The first step to clean your coffee maker is to unplug it. Begin with a thorough cleaning, and then clean it regularly to keep it fresh. Soak the parts of the product in water, and then scrub them clean with a sponge or dishcloth. Once the parts have been cleaned, wipe them dry with a clean cloth. You can use a coffee maker cleaner to get rid of any hard buildup.

How To Deep Clean a Coffee Maker

The best way to clean a coffee maker is to use a cleaning solution that is safe to use on all types of coffee makers. The best part is that you can buy these types of cleaning solutions in a bottle that you can use over and over again. Many people use dish soap to clean their coffee machines, but this isn’t the best choice, since some soaps can leave a build-up behind. This is bad because it can affect the taste of your coffee. The best way to go about cleaning it is to fill it with water and then add the cleaning solution. This way you can be sure that everything is getting clean.

Follow this guide to clean a coffee maker. To begin, you should use a damp cloth to clean the outside of the machine.

  • Prepare Your Coffeepot For Cleaning

Before you begin to deep clean your coffee maker, you first need to prepare it for cleaning. First, unplug the product and allow any water inside it to drain away completely. Next, remove any removable parts and clean them thoroughly with warm water and soap or a cleaner especially made for coffee makers. 

Here are the most popular cleaning methods:

drip coffee maker
    • Cleaning With A Disinfectant – Vinegar

    If you want to go the safest route possible, you can clean your coffee maker with a disinfectant. Vinegar is said to be the best budget-friendly and natural disinfecting agent. Make sure to rinse it off well, as even a little amount of vinegar in the coffee maker could turn your coffee taste bad and unhealthy.

  • Cleaning With A Coffee Maker Cleaner

You can also use a coffee maker cleaner to remove the hard buildup from your coffee machine. There are plenty of cleaning solutions available at your nearby store. A few drops of cleaner mixed in water can do the trick. 

  • How to Deep Clean a It Using Vinegar and Baking Soda

Combining vinegar with baking soda is a natural choice for deep cleaning a coffee maker. Simply place 1/2 cup of baking soda and 1/2 cup of white vinegar into a coffee maker. Turn the coffee maker on as per your manufacturer’s instructions, and allow it to run until the mixture has been completely used. This will help remove any buildup in the coffee maker and leave it fresh and hygienic.

  • How To Clean a Coffee Maker Using Dry Baking Soda

Dry baking soda is an all-natural cleaning agent that can be effective at deep cleaning your coffee maker. Place 1/2 cup of baking soda in your coffee maker. Turn the coffee maker on as per your manufacturer’s instructions, and allow the baking soda to work its magic. Once the baking soda has finished cleaning your coffee maker, simply rinse it out with water to remove any residue and dry it off.

  • Dry and Reattach

Make sure all removable parts are thoroughly dry before reattaching them. For example, the filter basket should be completely dry before replacing it to prevent a build-up of moisture inside the coffee maker. Similarly, removing and cleaning the carafe will help prevent oil and residue from building up and making a mess in your coffee maker.

After you’ve finished cleaning the machine, you should fill the water tank with plain water and run a few cycles to make sure that the machine is clean and free from any cleaning solution.

coffee maker in a dinner

How Often Should I Deep Clean a Coffee Maker?

While it’s important to deep clean your coffee maker regularly, it’s also important to avoid cleaning it too often. Excessive cleaning can strip away the oils that protect it’s internal parts, which can lead to corrosion and reduce the product’s lifespan. 

The frequency of cleaning will depend on a variety of factors, including the number of people who use the coffee maker and the type of water you use. Similarly, the type of cleaning method you use will affect how often you need to clean it. For example, the baking soda cleaning method will only need to be used once every 2 months. 

How to Clean a Drip Coffeemaker?

Drip coffee makers are the most common type on the market, which is why they are often referred to as standard. The first step in cleaning a drip coffee maker is to empty the water tank, filter basket, and carafe. You should also remove the brew basket and clean it as well. To clean the carafe, use warm water and dish soap with a clean sponge or cloth. You can also use vinegar and water on the carafe to remove stains. To clean the filter basket, use paper towels or cloth with warm water and soap. You can also use vinegar to clean the basket and remove the smell.

clean a coffee maker

Brew Your Fresh, Aromatic Cup!

Coffee is an important part of our lives, and most of us simply can’t go without it. A hot cup of coffee in the morning is what keeps us going after a long tiring day at work. This guide to clean a coffee maker will result in a clean and sterilized machine that will help to improve the quality and longevity of all the parts of it.

While cleaning it, make sure to avoid using scouring pads, brushes, and other hard cleaning tools. You should not use abrasive materials such as steel wool when you clean the coffee machine. This can scratch the inside of the machine, which can lead to leaks.

If you believe that your appliances and your property need deep cleaning, contact My CleaningAngel today. Visit our website for more effective cleaning tips and hire us for your next cleaning endeavor. Our team of professionals takes any cleaning job as a challenge and provides the customers with a spic and span finish. Schedule cleaning services online, it’s easy and fast.

How To Schedule Cleaning Services Online

How To Schedule Cleaning Services Online

Cleaning services have evolved into something that’s very convenient and easy to use today, unlike when they first started out. Nowadays you can schedule cleaning services online, pay bills online, and even get all of your questions answered from the comfort of your home or office with very little effort on your part. Book cleaning services online provide you with many benefits like convenience, flexibility, and efficiency. But it can be hard to know where to begin if you’re new to the process.

Professional house cleaning services strive at making the scheduling process as comfortable and easy as possible. With just three steps! If you’re looking forward to schedule house cleaning services online, continue reading to find out how it works!

book cleaning service online

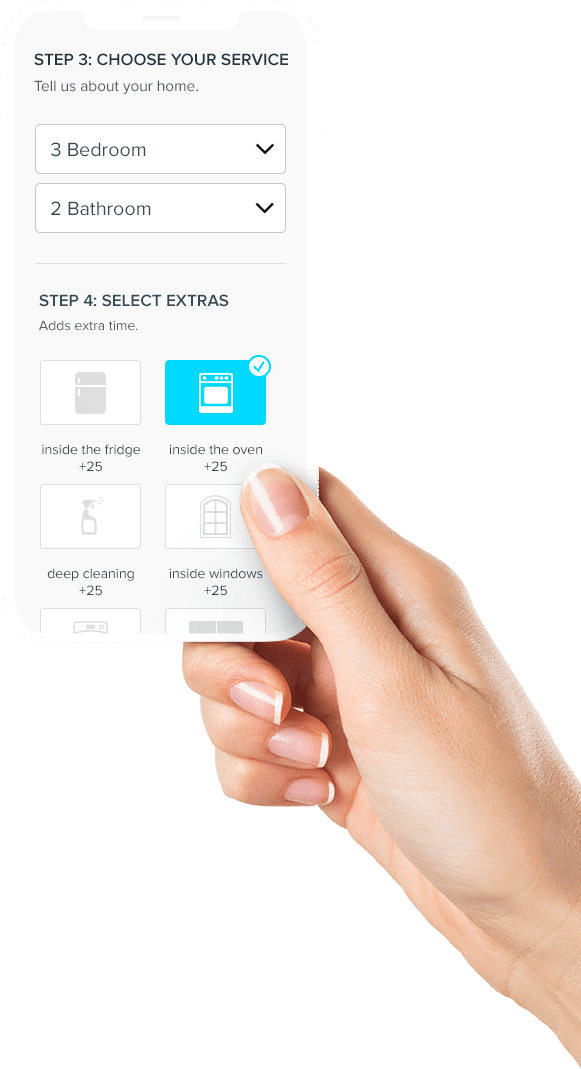
Select the Right Service

The first step in the scheduling process is for you to find the service that you’re looking for. You can choose from a wide variety of cleaning services that are tailored perfectly according to the requirements and conditions of your home, office, or any other commercial residence.

This step also involves a free online estimate. Which is provided based on the size of your home, the level of cleaning you want, and the time you want the professional cleaning staff to come to you. This online estimate system helps in giving you a fair price analysis. So you don’t have any unwanted surprises once the cleaning is done. Here are the online cleaning services that will help you pick the right category!

Residential Cleaning

If you’ve ever tried to clean your home on your own, you know it’s a tough job that requires a lot of time and effort. The results aren’t always satisfying or up to your expectations. After all, cleaning is a daunting task and not everyone is cut out for it. If you feel that your DIY house cleaning is lacking that “expert’s touch”, then you know it’s time to go ahead and schedule cleaning services online. An expert cleaning service will provide you with a team of skilled cleaning professionals. They can guarantee impeccable service and outstanding cleaning results. The best part is that you can follow the hassle-free process and choose your suitable cleaning service, all within minutes!

One-Time Cleaning

Whether it’s the holiday season or you’re planning a party and get-together with friends. Cleaning the nooks and crannies should be the least of your concerns. One-time cleaning is a great opportunity to prep your home through basic or deep cleaning. So you don’t have to run around with a broom and mop during the holidays!

Move In – Move Out Cleaning

Cleaning should be a very important part of your moving in or moving out checklist. It is vital to make sure that the new tenants will have a good impression of your property. You can do this by making sure that they find everything in perfect condition when they arrive at their new home. We know that there are a million reasons why you might not have time to clean when you move in or move out. Opting for professional cleaning services is a great option to get things done quickly and efficiently!

schedule cleaning sercices online

Post-Construction Cleaning

The completion of a home renovation or construction project is incomplete without some deep post-construction cleaning performed by skilled professionals services. If you’re moving into your dream home, it’s necessary to get it professionally cleaned. Get rid of any unwanted dust, debris, or germs that might have settled during the remodeling. 

Recurring Cleaning

Recurring cleaning includes weekly, bi-weekly, tri-weekly, or monthly cleaning done by a team of professionals who tidy your house and maintain it thoroughly. That way you can have a relaxed weekend and spend quality time with your family! Recurring cleaning ensures that your home is frequently deep cleaned. It stops the dust from settling in all the blind spots and crevices of your property.

Vacation Rental Cleaning

This type of cleaning gives property owners a worry-free experience by giving their house a squeaky clean makeover. This helps to keep the owner’s mind at ease and effectively prepares your property for renters. If you’re a property owner, cleaning can also help avoid negative reviews by guests on vacation; we all know how dire that can be!

schedule cleaning sercices online

Commercial Cleaning

Commercial cleaning is the service of cleaning buildings, offices, and other commercial spaces, and it is one of the most important branches of cleaning. The reason for this is that in commercial spaces there are many things that must be taken care of, such as the building itself, carpets, windows, desks, technical equipment, and the list goes on!

One of the main reasons why commercial cleaning is essential for a workspace is that it helps to keep your business looking professional and your business place looking clean. This will help your customers feel more comfortable when visiting your establishment and it will also make sure that you are able to leave a good impression on your potential clients.

Commercial cleaning can include anything between cleaning shelves, furniture, desks, and floors to provide a clutter-free environment for employees that will boost maximum productivity. Commercial cleaning service providers work by offering organizations with optimal cleaning solutions, giving them incredible experience in the field. This expertise when combined with the usage of state-of-the-art cleaning equipment gives organizations and companies a spic and span work environment! All you have to do is select any of their available online office cleaning services, get an estimate, and let them handle the rest for you!

Bank & Financial Institutions

Behind the immaculate and tidy look of banks and related institutions are a team of qualified cleaners who look after the space and keep it well-maintained for staff and customers. 

Government Facilities

With the bustling in and out of employees and officials all day, government offices and buildings become prone to bacteria, dust, and unwanted germs. In such cases, deep cleaning or regular cleaning is essential in keeping the facility meticulously clean and healthy. 

Schools & Universities

Teaching institutions are high-traffic areas where an array of classrooms, toilets, halls, and playgrounds need to be properly disinfected, sanitized, and cleaned to ensure a safe environment for children to learn and grow! 

Gym & Fitness Centers

While fitness centers might be synonymous with good health and physique, they are also the focal points of germs. And they can travel through common equipment and closed facilities. Proper maintenance and thorough cleaning are necessary for such places to keep harmful elements at bay. So you can enjoy your workout in a fresh and sanitary environment!

Medical Offices

Whether it’s a clinic or a dental office, cleanliness is paramount in all medical facilities to keep the place free of unwanted viruses. Medical cleaning is much more rigorous and requires significant attention to detail than residential cleaning. So hiring professional cleaners is the best choice for a contamination-free space for patients and staff alike.

Once you have chosen your desired cleaning service category, you can go ahead and select your Extras. Extras are additional options available for cleaning and maintenance. Like inside the fridge, oven, cabinets, garage sweeping, and folding laundry.

schedule cleaning sercices online

Secure Payment

After you’ve entered all your necessary information, house or office address, scheduled time, chosen extras, and given specific cleaning instructions, you can now confirm the total estimate. Once confirmed, you can move forward to the seamless payment method. It gives you a smooth experience like no other! Here you can pay through card only. So the hassle of checks and cash is eliminated. After the payment, you will get an email confirmation to ensure that your appointment has been booked. The best part is that your card will be charged only after the cleaning has been completed. And you are left satisfied by the flawless job done by the team!

Sit Back & Relax

This will be your favorite part of the process where you get to kick back, relax and let the professionals take over the cleaning for you! After the selection of the appropriate cleaning variety, payment and confirmation, you will receive a certified cleaner (or a team of cleaners) at your desired time and date. The cleaning experts are skilled craftsmen who know their way around. They can face any challenges they might face during cleaning. It’ll give your home, office, or facility the utmost attention and care. 

Once the required cleaning is completed and you are satisfied with the outcome of your space, you will be billed. And you’ll receive a receipt in the confirmation email. Cleaning Professionals live by this stress-free process so you can hire commercial and domestic cleaning services online. Without having to worry about getting scammed or disappointed!

schedule cleaning sercices online

5 Reasons Why you Should Hire Commercial & Domestic Cleaning Services Online

Sometimes, there are just too many things to do, and all of us need some help from the outside. Especially when it comes to doing something as tedious as cleaning. If you have been thinking of renting some professional cleaning services, but haven’t made any progress, then you might want to consider scheduling online services. You’d save time and money in the long run.

Commercial cleaning is also a fundamental part of maintaining a clean environment that protects employees, customers, and visitors. Here are five important reasons why you should ditch the traditional hiring methods and schedule house cleaning services online provided by MyCleaningAngel!

1. Handpicked Cleaning Professionals 

MyCleaningAngel aims at hiring the most reliable and friendly individuals who are committed to providing you with a pleasant cleaning experience. Every single member of the team has tremendous talent. An eye for all the hidden dirt and debris. And follows a commitment to delivering the highest cleaning standards. Cleaners are provided with a suitable checklist according to the extent of the job. Which they go above and beyond to complete. Cleaning equipment and supplies are provided to workers and are free of cost. Cleaning someone’s home or workspace is a huge responsibility. That’s why they ensure that their staff is thoroughly vetted, background checked, and able to communicate with you effectively!

2. No Risk of Scams

One of the biggest factors that might make you hesitate from hiring cleaning services online is the fear of getting scammed. Specially in the case of online payments. But the cash-free payment process assures you a payment method that is safe and secure. So your investment is of top priority. Client satisfaction is the foremost responsibility. Once you are happy with the cleaning outcome, the cleaning specialists get paid for the hard work!

3. A Time Saver

The hassle of going through multiple options and choosing the traditional route for hiring cleaners can be frustrating at times. There is little to no variety available and you have to trust non-vetted individuals with your property. MyCleaningAngel eliminates this concern and gives you a time-saving estimate form with a reasonable price range well within your budget. There is a massive variety of options to choose from. The entire hiring process is completed in less than a few minutes!

4. Flexibility 

Most online interfaces provide you with great flexibility. Whether it’s the diverse collection of types of services, safe payment methods. Or even the option to select any time and date that works for you. If you can’t find your specific type of service, you can use the estimate form. So you can tailor a cleaning service according to your requirements. If you happen to have an unplanned get-together or occasion coming up, then you can easily reschedule your appointment. It’s better to do before the cleaning day, to be absolutely free of cost!

schedule cleaning sercices online

5. Maintain an Exceptional Brand Identity 

A pristine workspace is one of the building blocks of a great brand identity. Whether it’s a corporate office, a government facility, or a medical center. Reflective counters and shiny floors are not only pleasant to the eyes. It also induce a surge of positivity in your clients and customers. Hiring professional cleaning services online saves time. It lets you focus more on the growth of your business or organization. Potentially enabling you to outdo your competition!

The Best 10 Green Cleaning Tips

The Best 10 Green Cleaning Tips

What is Green Home Cleaning?

Green home cleaning is the use of environmentally friendly cleaning products, methods, and processes. It aims to preserve the quality of the environment and human health. 

Green cleaning is an approach that does not use harmful substances and products in the cleaning process. It also does not put harmful chemicals into the air, groundwater, or soil. Green products are effective for both home and office cleaning and have a variety of uses.

Here are some green cleaning tips to help you make the switch to green cleaning. This guide to green cleaning will help you save time, money, and the planet. And they’ll help you feel better about the process, too!

book cleaning service online

1. Recycled Paper Towels and Old Clothes

Paper towels are a major waste in the U.S., with the average American using 13 billion pounds a year. One of the best green cleaning tips is to use recycled paper towels. 

Despite their innocuous nature, paper towels have a big environmental impact. The production of paper towels requires massive amounts of energy and water. It also releases carbon dioxide and methane. These gases can be harmful to the environment and human health. Paper towels are also a significant source of waste, contributing to $12 billion of non-recyclable waste each year.

100-Percent Recycled Paper Towels

Using 100-percent recycled paper towels is an excellent way to reduce your household’s impact on the environment. Unbleached and made with at least 80% post-consumer recycled material, they are ideal for cleaning and are free of dyes, inks, fragrances, and other additives. They also absorb spills and messes quickly.

Options

When it comes to paper towels, you can choose between a few different types. Some are made from bamboo is more environmentally friendly than other alternatives. Some are even vegan and have a small business feel to them. 

  • The Cheeky Panda

The Cheeky Panda brand is one such example. Their paper towels are strong and absorbent and are shipped in cardboard boxes without plastic. In addition, the company supports organizations like the World Land Trust and Whale & Dolphin Conservation.

  • The Seventh Generation 

The Seventh Generation paper towel is another option. It uses 80% post-consumer recycled material and is biodegradable. The white color is produced with no chlorine or other dyes, and its strength is high. It’s also biodegradable, which is an important factor in green cleaning.

  • Washcloths!

Another great way to reduce your impact is to make use of washcloths instead of paper towels. Washcloths can be reused many times and are less likely to be thrown away. Using washcloths is also a great way to reduce your use of microplastics.

green cleaning tips

2. Baking Soda Is A Multi-Purpose Ingredient

Baking Soda can be an alternative to a lot of harmful chemical-based cleaners. It can be used for a variety of green cleaning tips. The purposes baking soda can serve include:

  • Baking soda has a neutralizing effect on foul smells 
  • Can also be used to clean hard-to-reach areas and acts as an all-purpose scrubber
  • Baking soda is inexpensive and widely available, making it a very cost-effective green cleaning ingredient
  • It is also useful for scrubbing carpets and upholstery 
  • You can also mix baking soda with water to make a homemade air freshener. However, do not use baking soda on electronic devices or painted surfaces 
  • You can also make your cleaning wipes by mixing a teaspoon of baking soda with water 
  • It works well on bathroom drains. Sprinkle a small amount on the floor of the bathroom and wait for 15 minutes before flushing with hot water. The baking soda will absorb dirt and remove musty smells from the bathroom. 
  • It is also effective in cleaning stainless steel sinks.

3. Hydrogen Peroxide

Hydrogen peroxide is a safe and effective natural disinfectant and stain remover. You can buy hydrogen peroxide in refill bottles and spray bottles. A few drops are enough to clean most surfaces around your home. This powerful tool for green home cleaning is a great alternative to bleach and will help you make your home and its surroundings cleaner.

Hydrogen Peroxide and Baking Soda

Hydrogen peroxide is inexpensive and can be used anywhere. It can be mixed with baking soda to create a cleaning paste. Mixing the two will work well to remove stubborn stains and mold. Just remember that hydrogen peroxide will break down if it is exposed to light. Therefore, it is important to store the solution in a dark or brown bottle to avoid exposure to light.

It’s safe to use in your bathroom as long as you don’t mix it with vinegar. It won’t work as well if it’s expired, but it won’t hurt your health. Hydrogen Peroxide can also be used to whiten your grout. If you are concerned about the safety of hydrogen peroxide, mix it with baking soda to make a paste. Apply the solution to the affected area and let it sit for about 15 minutes before rinsing away with hot water.

Hydrogen Peroxide and Water

This natural disinfectant can be diluted with water and used on all kinds of surfaces, including your kitchen, bathroom, and refrigerator. You can also use it in your dishwasher or microwave to get rid of stubborn stains. Mix one part hydrogen peroxide to one part water and apply it to the affected area. After a few minutes, you should have a clean and disinfected surface!

green cleaning tips

4. Houseplants Improve Indoor Air Quality

Plants improve the quality of the air in your home by trapping harmful vapors. These molecules are called volatile organic compounds or VOCs. They are a common by-product of the manufacture of everyday household items. Inhaled VOCs can cause a dry throat, itchy eyes, and even nasopharyngeal cancer. Common pollutants that can affect the air quality in your home are pollen, dust, pet dander, and smoke. Houseplants can reduce these pollutants.

The best way to protect your family’s health is to limit the amount of pollution inside your home. This can be done by increasing ventilation or limiting the number of indoor pollutants you use.

The most effective method for green home cleaning is house plants. Many types of houseplants can improve the air in your home. One of the most effective plants is the Snake Plant (also known as Mother-in-Law’s Tongue). This plant can absorb airborne toxins and has minimal maintenance requirements. It is a native of West Africa and is easy to grow indoors.

Aside from reducing the concentration of these pollutants, houseplants also reduce stress and improve air quality. 

5. Simmer Pots Enhance the Smell of Clean

If you’re looking for an inexpensive way for green home cleaning by creating your scents, simmer pots are an excellent option. They allow you to reuse food scraps and bring nature indoors. The scents from simmer pots are authentic and are a great way to create a greener home.

Herbs and Citrus

Simmer pots are wonderful ways to enhance the scent of your home, and they can make a big difference in how your house smells. To create a fragrant potpourri, you can combine scented herbs and citrus in a pot and place it on the stove. This mixture will spread the fragrance throughout the house as it simmers. You can also try a combination of spices and dried flowers.

Cranberries

Cranberries have a tart and sweet scent, and they are a great complement to other spices in your simmer pot. They are a great addition to the pot and are often associated with Christmas. They also serve as a mood lifter. 

Cinnamon

Another popular option is cinnamon. This spice reminds many people of their childhood Christmases and is the perfect addition to any green cleaning blend.

Using a simmer pot will enhance the scent of your cleaning supplies while still allowing you to use them as you normally would. Typically, these pots last for thirty to sixty minutes, but you can extend the simmer time by adding more water to the pot. Be sure to check the water level periodically, since the potpourri will burn if it’s too dry.

green cleaning tips

6. Avoid Toxic Cleaners in the Trash

Toxic cleaners should never be thrown in the trash. Not only will they not be good for your local landfill, but they will also contaminate your water supply. You should look into toxic cleaner recycling programs and hazardous waste recycling centers in your community. Many of these programs accept items like old batteries and electronics. Many communities also have toxins recycling days and other ways to recycle these materials.

While it might be tempting to toss those toxic cleaners in the trash, it is a bad idea. Not only will they end up in the garbage, but they will also have negative effects on the air quality and the environment. 

7. Understand How Each Ingredient Affects the Environment

To choose the right green cleaning product, you must understand how each ingredient affects the environment. Many companies don’t disclose the full list of ingredients. You should always seek out independent third-party studies to ensure the safety and efficacy of the product. For instance, some green cleaning products are certified as fair trade products, which means that the manufacturers followed labor and environmental standards while manufacturing them. Green cleaning tips also include looking for companies that give a percentage of their profits to environmental causes.

8. Steam or Vapor Cleaners

Another green cleaning tip is to go for steam or vapor cleaners. These steam cleaners use steam to clean and disinfect without the use of harsh chemicals. Many people are turning to these cleaners to help keep their homes clean without using toxic cleaners.

9. Environmentally Friendly Products

When it comes to green house cleaning, among many other things that you can do to help protect the environment is using environmentally-friendly products. These products will reduce the amount of pollution in your home. For example, you can avoid using bleach and other harsh chemicals. Also, you can wash your dishes in cold water instead of hot. If you have a dishwasher, you can also use lemon juice to clean the inside of it. This will fight mold and prevent contamination of food.

green cleaning tips

10. Give DIY a Try

A downside of using environmentally-friendly cleaning products is the price. They are more expensive than their chemically-based counterparts. However, these cleaners are very concentrated, which means that you won’t need much of them. In addition to that, you’ll also cut down on the number of plastic bottles that you have around the house, which is one of the major green cleaning tips. In addition, you can create your cleaners using common household ingredients like baking soda or vinegar. 

Fortunately, many recipes for green cleaning are easy to make and inexpensive. These recipes are safe for your family and the environment and do not contain any harsh chemicals. If you make your own, it is even easier and less expensive than buying commercial products! And unlike commercial products, homemade green cleaning recipes are inexpensive and effective – and they are even safe for your children to use.

Another eco-friendly cleaning tip is to make your cleaning solution. Homemade cleaners are often less expensive and just as effective as store-bought formulas. You can clean most surfaces with these products for a fraction of the cost. You can also use ingredients that you already have in your home, such as vinegar, baking soda, or plant-based liquid soap.

green cleaning tips

Switch to Green Cleaning Today!

Green cleaning is becoming increasingly popular among businesses, but there are some hurdles to overcome before you can completely give up the chemicals and cleaning solutions you’re used to. One of the biggest issues is the lack of knowledge about the benefits of eco-friendly cleaning solutions. Use our green cleaning tips and apply in you cleaning routine. Another is the perception that it’s hard to achieve good results without using soap suds. 

As more people become aware of the harmful effects of cleaning products, companies are creating more eco-friendly cleaners. Companies like Clorox have even launched their green cleaning line called Green Works.

Follow this guide with green cleaning tips by MyCleaningAngel and notice the impact on the environment. Contact us today to get your property spike and span so you can focus on your daily tasks centered on green house cleaning. Booking cleaning services online has never been easier. Get an instant quote and book it now!