
Does the sink smell like something crawled in and never left? Many families deal with stubborn odors or slow drains from the garbage disposal. A simple routine with natural cleaners keeps the grinding chamber clear and the kitchen inviting.
A dirty unit can grow bacteria fast, which leads to funky smells and clogs. Studies show that regular cleaning cuts germs and helps keep a home safer. This guide explains how to clean a garbage disposal using baking soda, lemon peels, cold water, ice cubes, and salt.
Want fresh air near the sink again? Let’s fix it.
Key Takeaways
- Clean weekly with baking soda, vinegar, and lemon peels to reduce bacteria and keep performance steady.
- Natural cleaners are safer for kids, pets, pipes, and septic systems than harsh drain cleaners.
- Grinding ice cubes with salt scrubs stuck-on gunk and helps the grinding parts do their job.
- Always run cold water while the disposal runs, it solidifies grease and moves food waste out.
- Skip grease, fibrous vegetables, eggshells, and coffee grounds, these items cause many kitchen clogs.
Why Should You Clean Your Garbage Disposal Naturally?

Food scraps trapped inside start to rot. Bad smells drift out, and the sink area feels less welcoming for family and guests. Natural options like baking soda, vinegar, and lemon peels clean well without strong household chemicals.
Harsh drain cleaner products can damage plumbing and stress septic tanks over time. Families feel safer skipping chemical fumes under the sink. Bacteria love dark, wet spaces, especially around the splash guard. Slimy buildup or slow draining is a heads-up that kitchen maintenance is due.
Parents often use ice cubes with coarse salt to scrub the chamber while staying eco-friendly. Store-bought drain cleaners should be a last resort after heavy buildup. Going natural helps cut strong odors and keeps homes fresher in every season.
Steps to Clean a Garbage Disposal Naturally

A fresh-smelling sink starts with simple garbage disposal maintenance. The steps below control odors, move food waste along, and keep the grinding chamber clear.
Step 1: Disconnect the Power
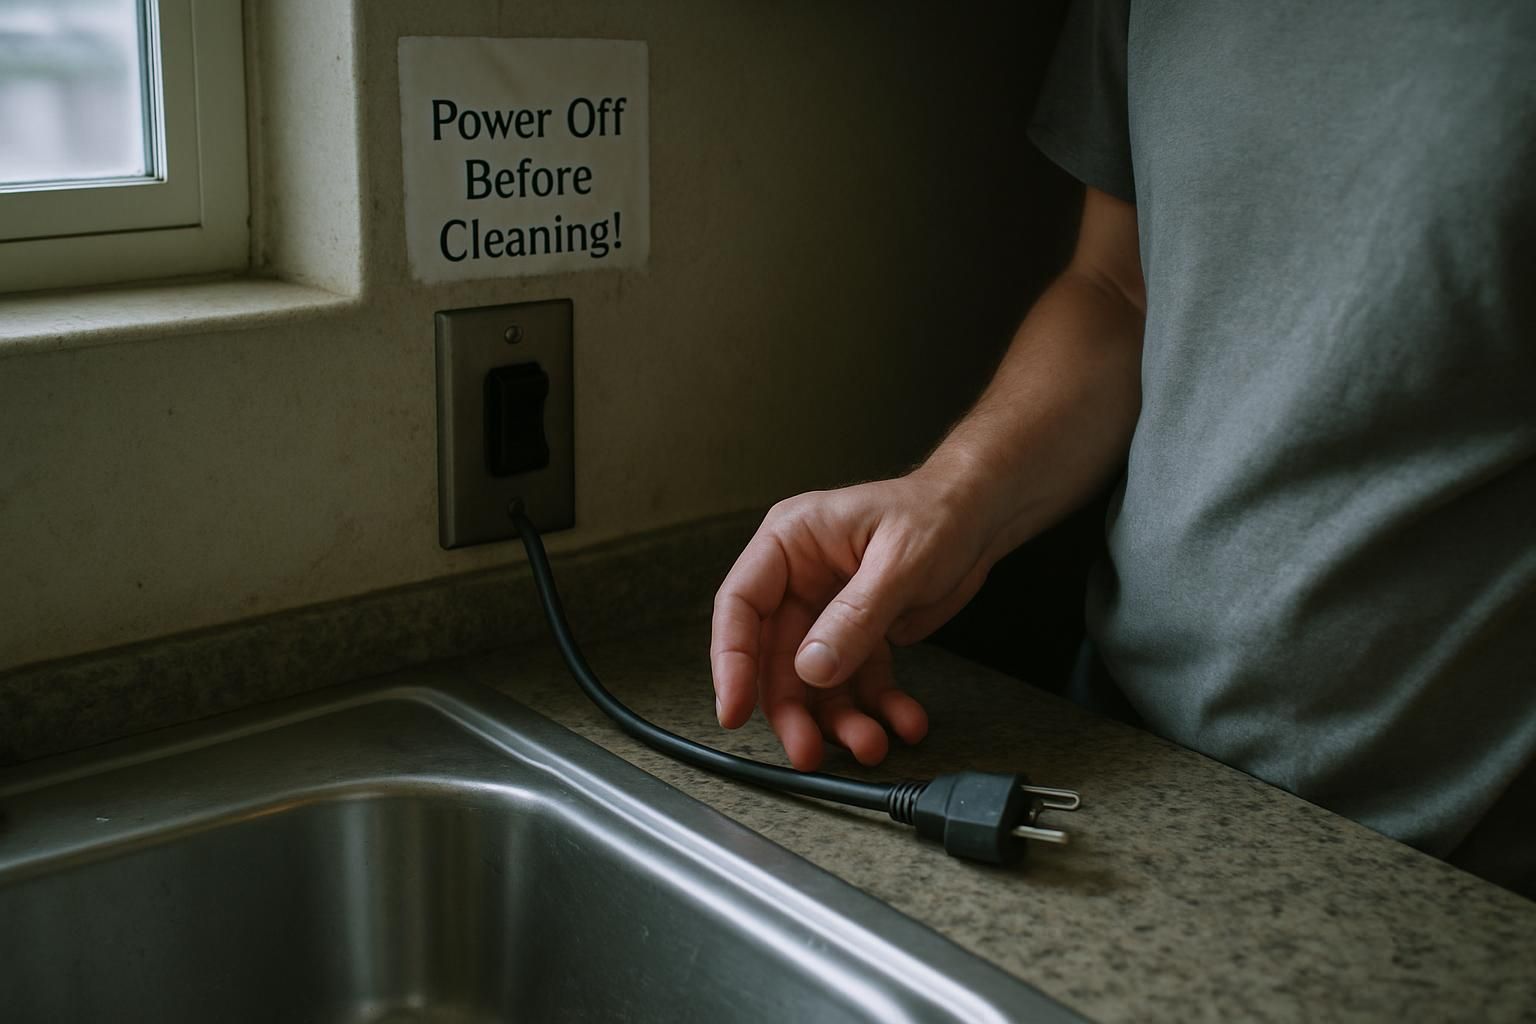
Flip the wall switch off. For extra safety, unplug the cord under the sink or switch off the breaker. No one should reach inside before cutting power. Those spinning parts can injure fingers in a split second.
One homeowner skipped this step and bumped the switch by accident. The scare was enough to make unplugging a forever habit.
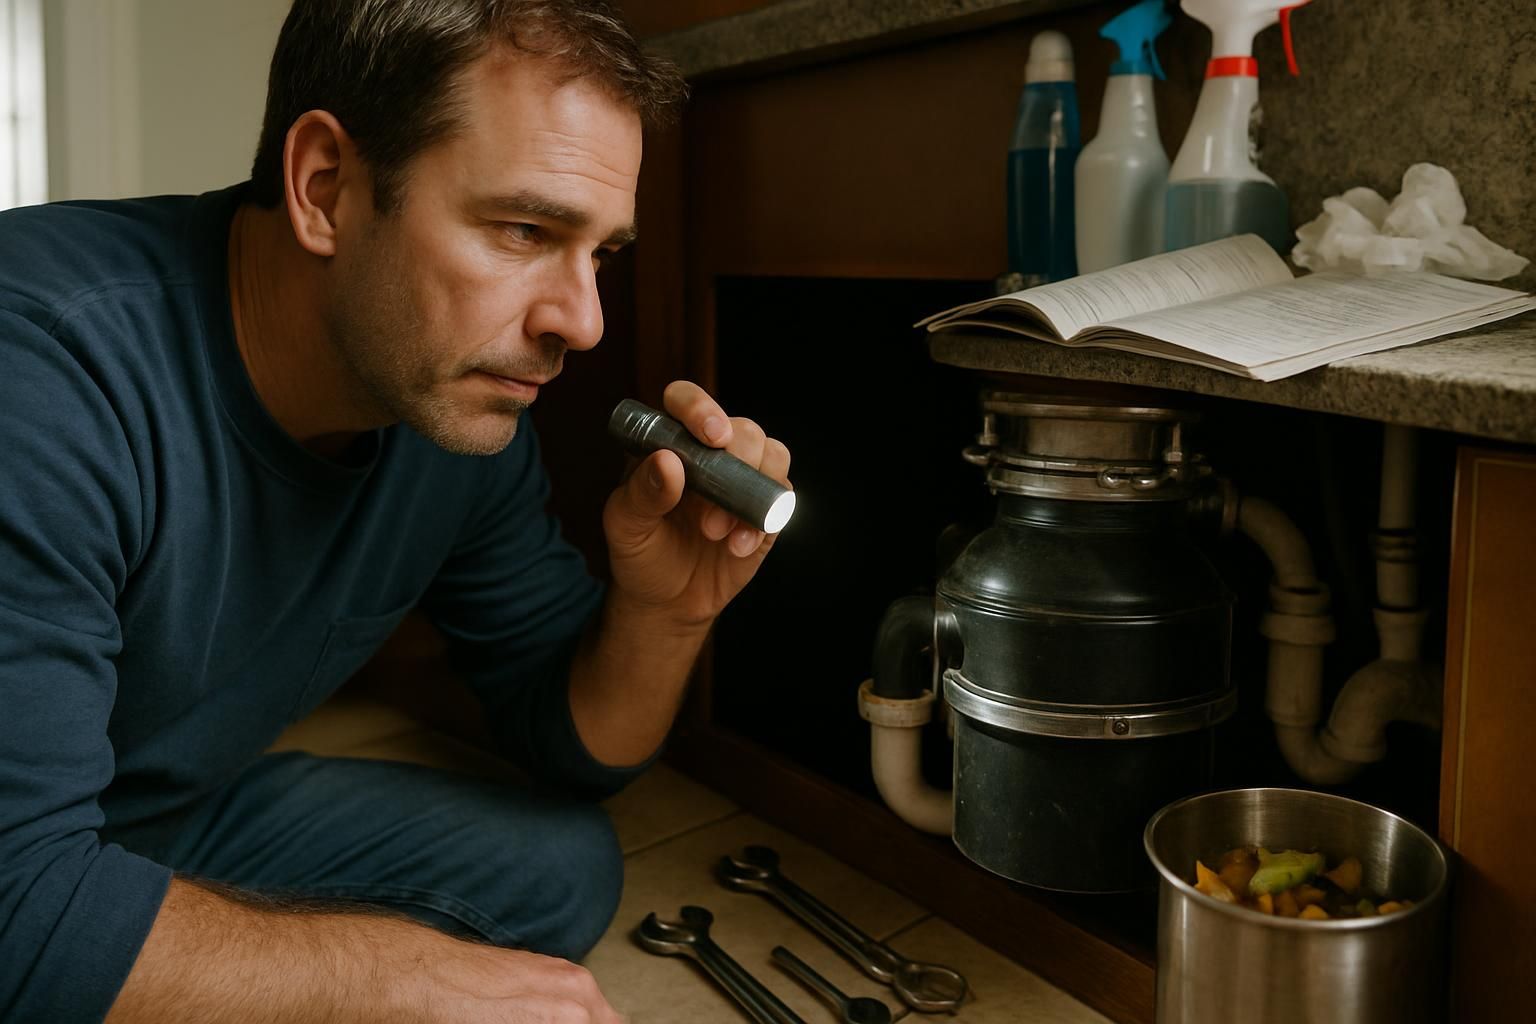
Step 2: Inspect and Remove Visible Debris
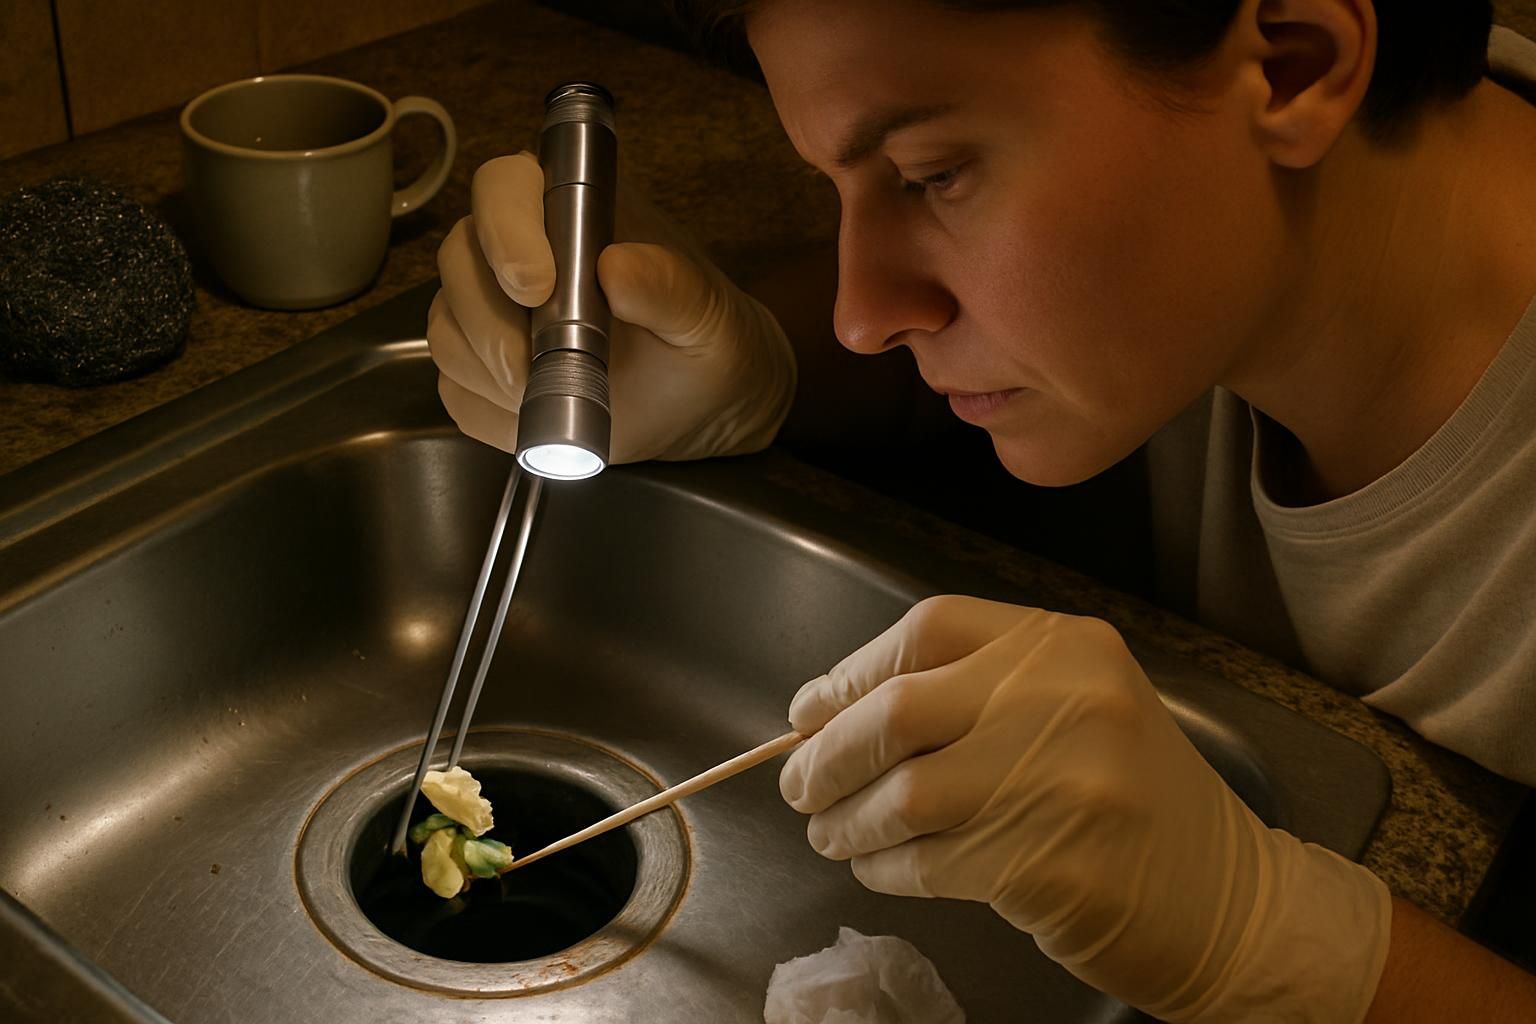
After the power is off, use a flashlight to look inside. Bits often hide along the rim. Grab large pieces with tongs or pliers. Never use bare hands.
Food slime likes the rubber splash guard. Use a toothpick or an old brush to clean the grooves. If hot water does not move debris out, pull it out before trying other fixes. Skipping this step lets odors grow fast.
Step 3: Clean the Splash Guard Thoroughly
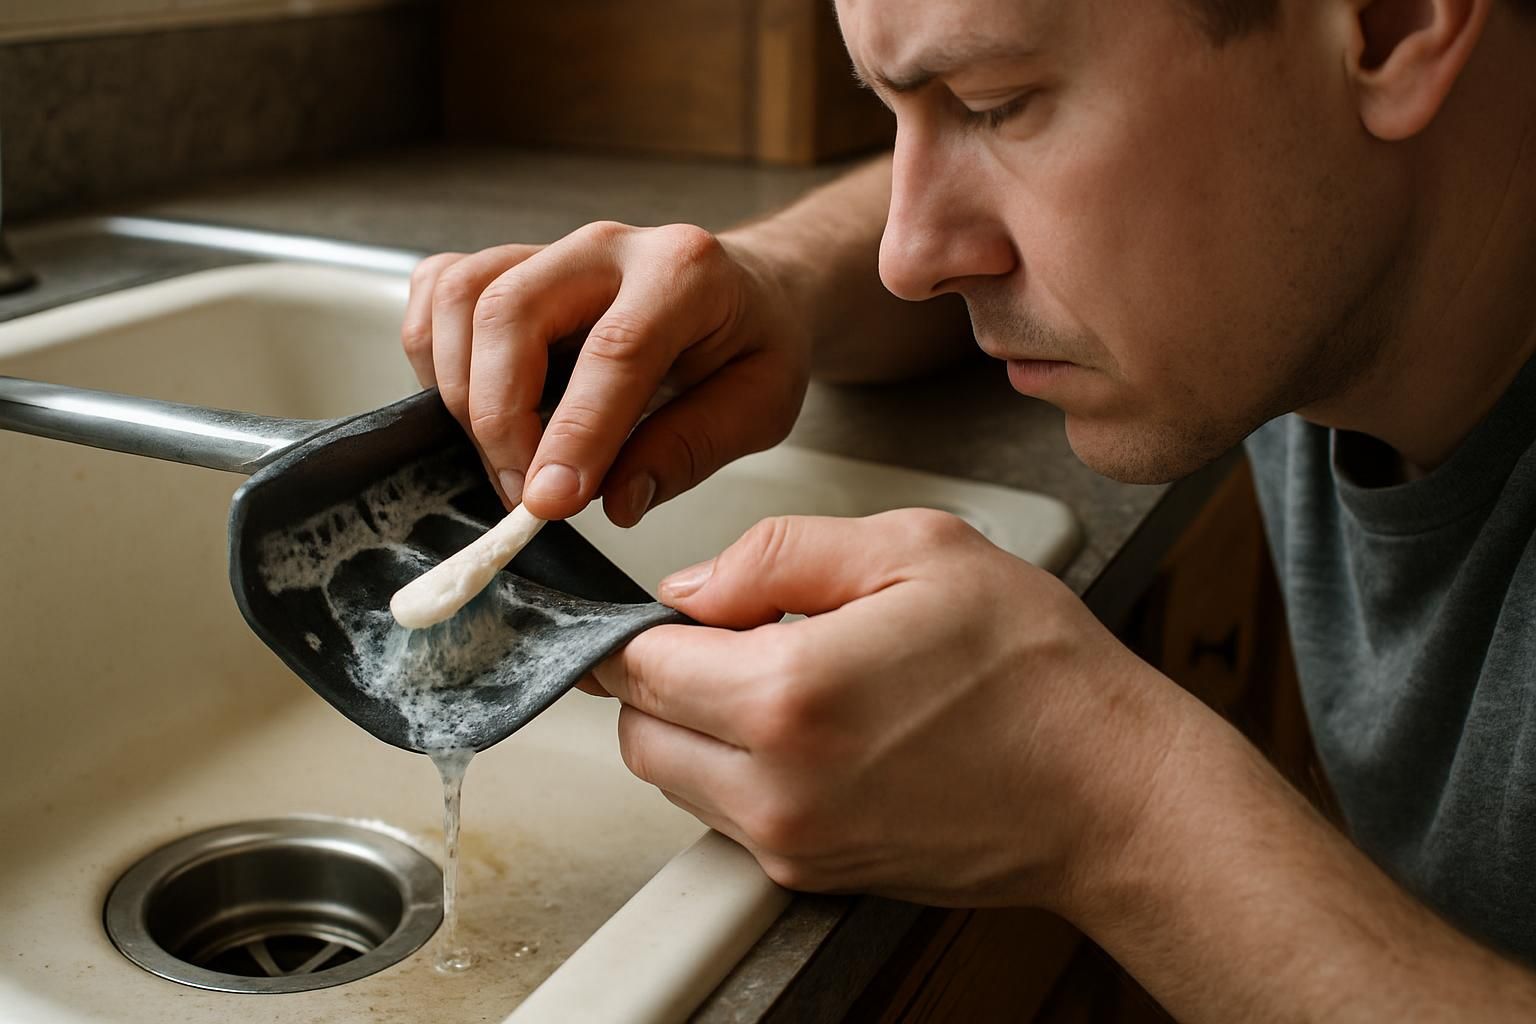
Now focus on the splash guard. Food hides under those flaps like a kid hiding veggies in a napkin. With the unit off, scrub under each flap using a toothbrush or small brush.
Make a paste with baking soda and a little dish soap. This cuts grease and targets the odor source. Many mystery smells start right here. A firm scrub often solves it without a repair call.
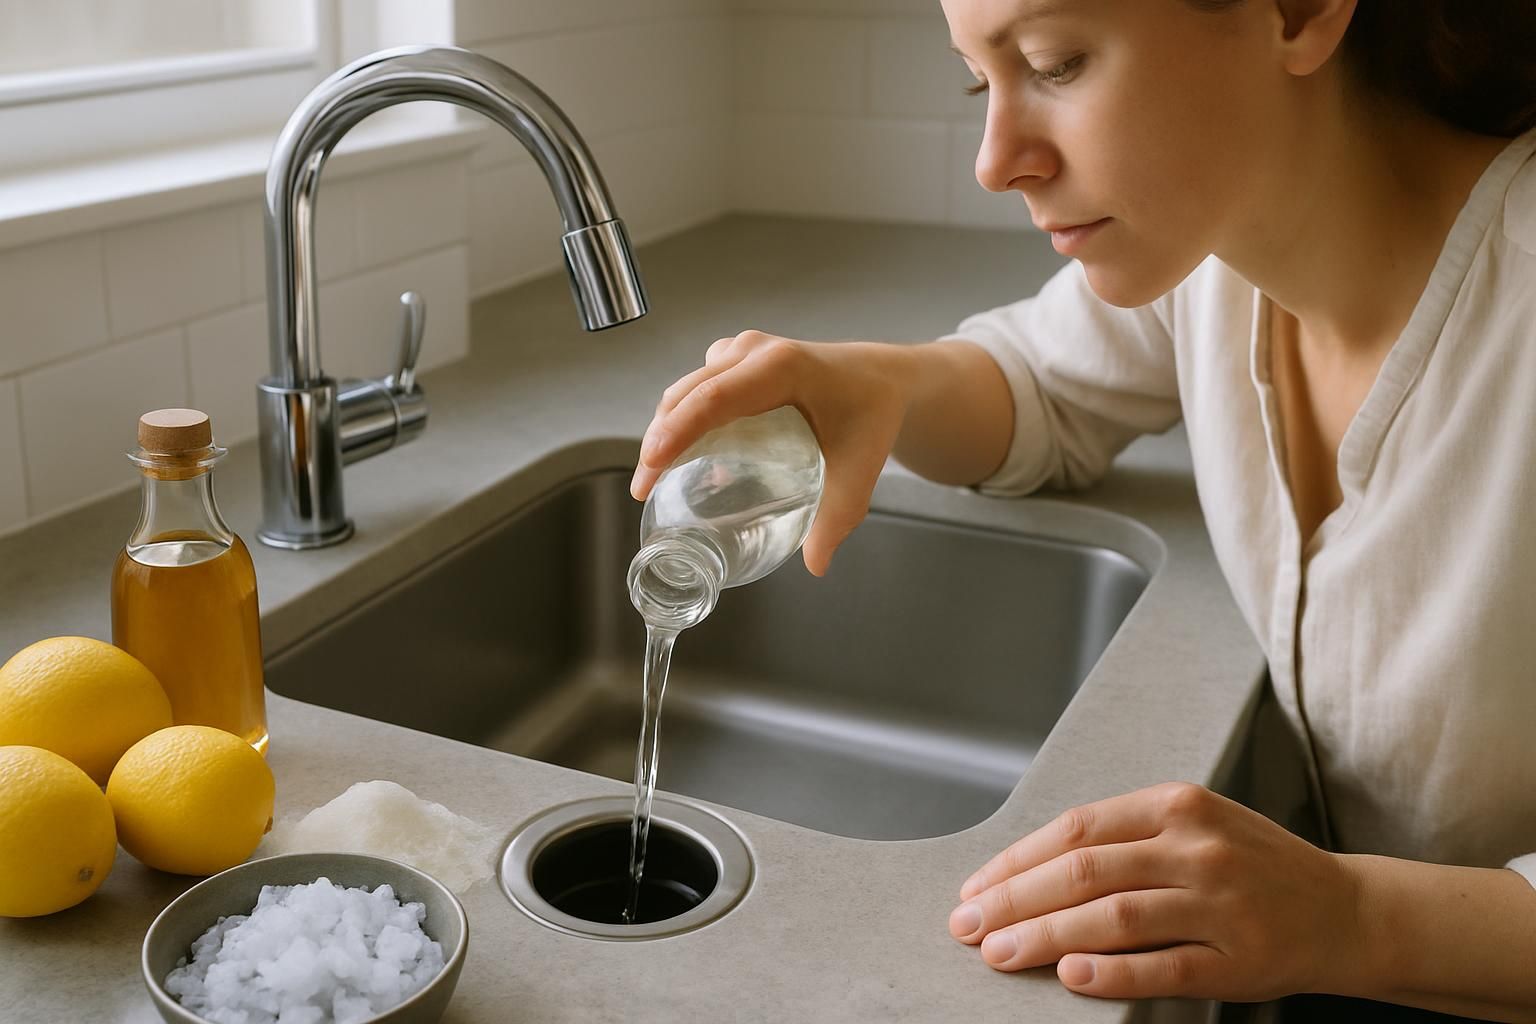
Step 4: Use Baking Soda and Vinegar for a Deep Clean

Pour 1/2 cup of baking soda into the disposal. Add 1 cup of vinegar. The fizz helps break down grime and neutralize odors without chemical cleaners.
Let it work for 10 to 15 minutes. Then run cold water and the disposal for about a minute to flush loosened residue. Many parents like this method because it is strong enough for daily life and gentle around kids and pets.
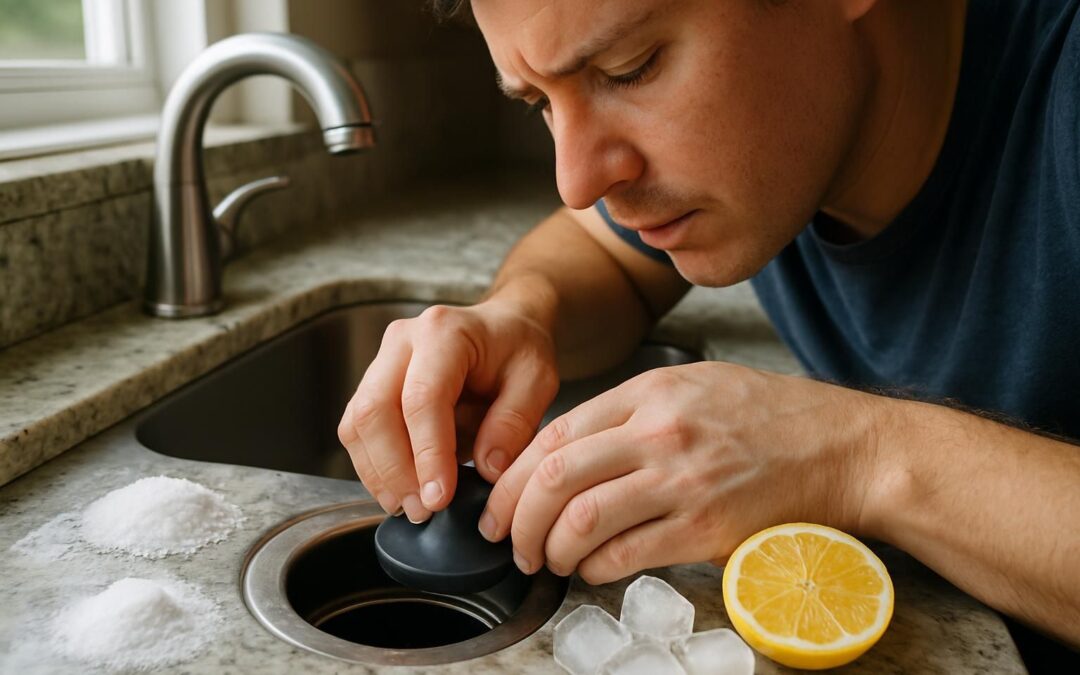
Step 5: Grind Ice and Salt for Blade Sharpening
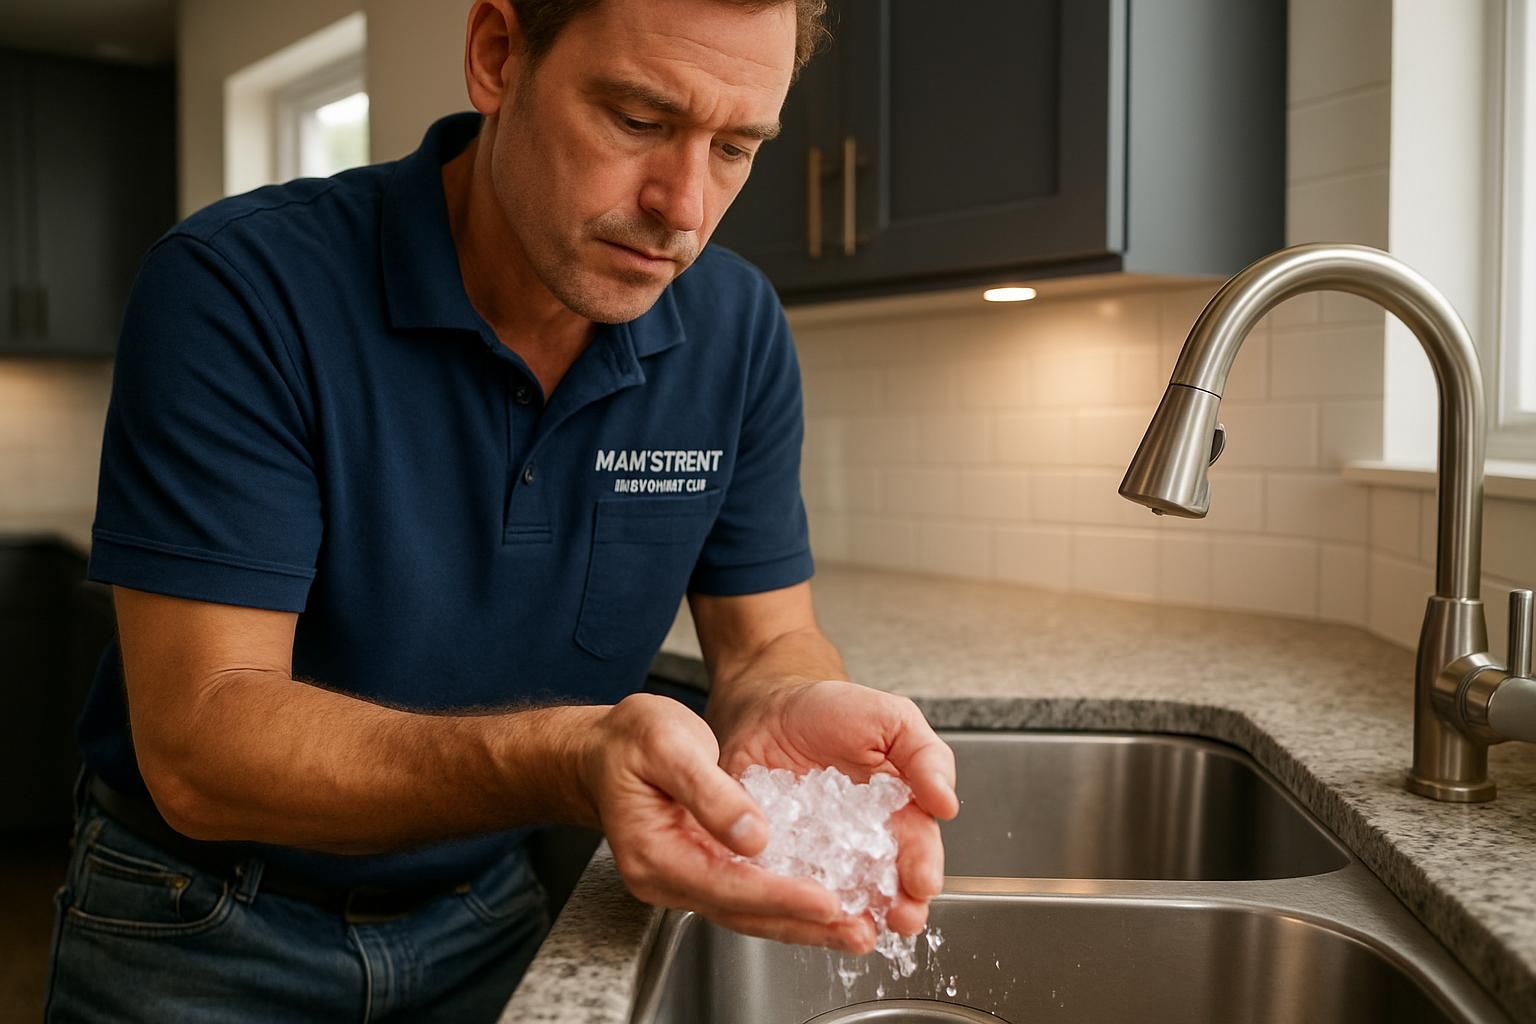
Drop in 2 cups of ice cubes and 1 cup of coarse salt. Turn on cold water for a few seconds, then run the unit. The mix scours stuck-on gunk and helps the grinding parts work better.
Many plumbers swear by this simple trick. The noise is loud for a moment, then the chamber feels fresher. Coarse sea salt, rock salt, or even regular table salt works when paired with ice.
Step 6: Use Lemon Peels for Freshness
Cut lemon, orange, or grapefruit peels into small pieces. Run cold water, switch on the disposal, and feed in the peels. Natural acids help break grease and leave a clean scent.
For extra punch, freeze vinegar with citrus chunks in an ice tray. Grind a few cubes with cold water. It cleans, deodorizes, and smells bright without chemical perfumes.
Alternative Natural Cleaning Methods

Short on time? These quick swaps handle light odors and light film in minutes.
Using Boiling Water and Dish Soap
Plug the sink, add a good squeeze of dish soap, and fill halfway with hot water. Pull the stopper and run the disposal while the soapy wave flows through. This sweeps out grease and loose debris.
For a quick reset, pour a kettle of boiling water into the disposal after cleaning. Heat softens sticky fats so they rinse away. It is a fast move for busy weeks.
Utilizing Citrus Fruits for Deodorizing
Lemons and oranges fight foul odors fast. The acids and oils break down sticky residue and brighten the smell. Toss a handful of fresh peels into the unit, run cold water, and grind for 5 to 10 seconds.
Parents like this option because fruit peels are safe around kids and pets. Weekly citrus runs keep the chamber from getting smelly in the first place.
Applying Essential Oils for Long-Lasting Freshness
After cleaning, add a few drops of lemon or orange essential oil to an ice cube and grind it. This fresh scent sticks around longer than peels alone and targets the odor source.
Essential oils also mix well with baking soda for a light scrub. Many households skip store deodorizers and still get a clean, bright smell.
Foods to Avoid Putting in Your Garbage Disposal
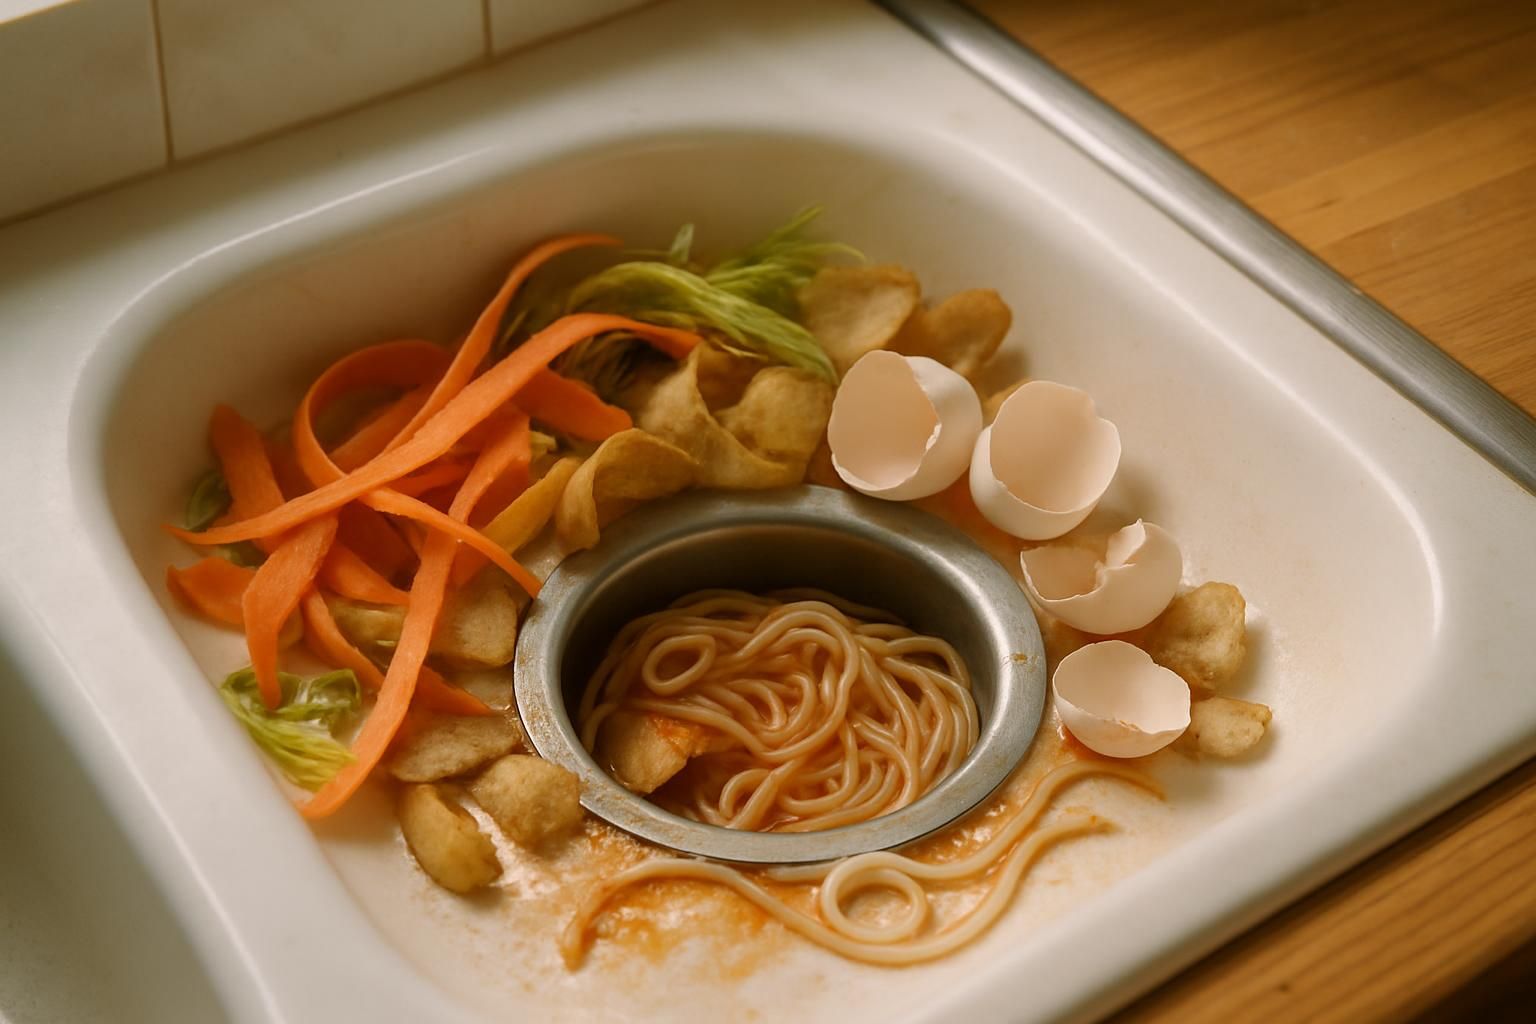
Some foods act like glue or rope in a disposal. Keep these out to avoid clogs.
Grease and Oils
Grease and oils turn solid as they cool, then coat blades and pipes. That sticky layer traps other food and creates tough clogs. Even boiling water struggles once the layer hardens.
Wipe pans with a paper towel and toss it in the trash. Teach kids that the sink is not for bacon fat or butter. Small amounts still build up over time.
Fibrous Vegetables
Stringy vegetables jam the unit. Celery, corn husks, and pumpkin guts can wrap around moving parts and stall the motor. The noise gets ugly, then everything stops.
Compost or trash these fibrous scraps instead. This simple habit prevents breakdowns and reduces repair costs.
Eggshells and Coffee Grounds
Eggshells seem harmless, but small bits mix with grease and form stubborn clogs. They can also dull the grinding parts faster. Coffee grounds pile up and pack tight in pipes, which causes slow drains.
Move eggshells and grounds to the trash or compost bin. Plumbers get many calls from these two alone.
How Often Should You Clean Your Garbage Disposal?

Most experts suggest a quick clean every week for steady performance. One busy parent noticed fewer smells right away after switching to a weekly routine.
If you notice odors, slime on the splash guard, or slower grinding, give it a deeper clean that day. Natural methods with baking soda and vinegar handle most jobs. For heavy buildup, a store product like a pod or tablet can help once in a while.
Regular care extends the life of the motor and the grinding parts. Skipping care lets smells spread fast, especially after a big family dinner.
Garbage Disposal Maintenance Tips
These simple habits keep things humming and cut down on garbage disposal repair calls.
Run Cold Water While Using the Disposal
Cold water helps harden grease, so the disposal can break it apart and push it out. Hot water melts fats, which then spread along pipes and set up future clogs.
After each use, let cold water run for 20 to 30 seconds. Think of it as sending scraps on a river ride out of the house. It also helps with odor control.
Avoid Overloading the Disposal
Large piles of leftovers can bog down the unit. Feed small batches instead. Too much at once can jam the chamber and strain the motor.
Even ice cubes and lemon peels need space to move. Keep grease and fibrous vegetables out entirely. A careful load today avoids a clog on a busy holiday night.
Regularly Inspect for Leaks or Wear
Leaks can sneak up under the sink and leave a mess. Check for damp spots, rust, or drips every few weeks. Loose connections or worn gaskets need attention before damage spreads.
If the unit vibrates, smells even after cleaning, or trips the breaker, call a licensed pro. A home warranty or service plan may help with repair costs. Safety first, always cut power before any hands-on check.
Conclusion
Keeping a clean garbage disposal does not have to be hard. Baking soda, vinegar, lemon peels, and cold water handle most grime without harsh chemical cleaners. Ice with salt helps scrub the chamber and keeps odors down.
A weekly routine saves time, money, and peace of mind. Small habits add up to a quieter sink and a fresher kitchen. With simple garbage disposal maintenance, that handy unit will stay reliable for years.
FAQs
1. What are the best natural ways to clean a garbage disposal?
You can use baking soda and vinegar for a deep clean. Pour half a cup of baking soda into the drain, then add one cup of vinegar. Let it fizz for ten minutes, then rinse with hot water. Citrus peels also help freshen up odors.
2. How often should I clean my garbage disposal using natural methods?
Clean your garbage disposal every week if you cook often or notice smells. If you rarely use it, once every two weeks works fine.
3. Can I put ice cubes in my garbage disposal to help clean it naturally?
Yes, ice cubes work wonders on stuck debris and gunk inside the blades; they knock loose bits free as they grind down.
4. Are there any foods I should avoid putting in my garbage disposal even after cleaning it naturally?
Skip fibrous veggies like celery stalks or potato skins; these clog pipes fast and make cleaning harder next time around. Grease is another culprit that sticks around long after dinner’s done, so toss it elsewhere instead of down the drain.
Troubleshooting and Safety Tips
If odors continue after following these cleaning steps, repeat the process and inspect for any lingering debris around the splash guard and disposal blades. Check for clogs in the drainage pipes and ensure that no food bits remain.
Always verify that power is completely disconnected before performing any maintenance. Review the disposal manual for further safety precautions if uncertainties arise.
Additional Insights
To clean a garbage disposal, first carefully turn it off and disconnect power. For a quick clean and deodorize, use a mixture of ice cubes, salt, and cold water. For a deeper clean, pour 1/2 cup of baking soda into the disposal and add 1 cup of white vinegar.
Let the mixture sit for 5-10 minutes to bubble, then run hot water while the disposal runs.
This video demonstrates how to clean a garbage disposal using ice, salt, and vinegar:59sConcord Carpenter YouTube ⢠Jan 25, 2022
Method 1: Ice, salt, and cold water – This video demonstrates how to clean a garbage disposal using ice, salt, and vinegar:00:45Today’s Homeowner with Danny Lipford YouTube ⢠Apr 19, 2023
Method 2: Baking soda and vinegar – Turn off the power to the disposal. Pour 1/2 cup of baking soda into the disposal. Add 1 cup of white vinegar and let the mixture bubble and fizz for 5-10 minutes. Turn on the hot water and run the disposal to flush the mixture.
Disclaimer: This content is provided for informational purposes only and is not a substitute for professional advice.